Updated on 18-Jun-2026
Why is mould growing beneath the vanity or around the pipes, how far has the moisture travelled, and what must be opened, repaired, cleaned or replaced to stop it? How to remove mold under vanity and around plumbing pipes?
Mould under a bathroom vanity is rarely just a dirty-cabinet problem.
A dark patch around a drain pipe, swollen cabinet floor or musty smell behind the vanity often points to water escaping from a plumbing connection, condensing on a cold pipe or entering an unsealed opening in the wall.
The visible growth may be small. The damp area behind it may be much larger.
This matters because most modern vanities contain particleboard, medium-density fibreboard, plywood, paper-faced drywall and wood framing. These materials can absorb water, remain damp inside a closed cabinet and support fungal growth.
Health Canada identifies plumbing leaks, condensation, inadequate ventilation and wet building materials as common causes of indoor mould. It also advises correcting the moisture source because mould is likely to return when the underlying problem remains. Ultimate Mold Crew helps get rid of mold in your home in areas including: Basement, Attic, Bathroom, kitchen, Crawlspace, drywall, ceiling, wooden floor, attic plywood, concrete and more.
Table of Contents
What Mold Under a Bathroom Vanity Usually Means
A bathroom vanity places several water-carrying parts inside one small enclosure:
- Hot and cold water supply lines
- Shutoff valves
- Flexible faucet connectors
- Faucet shanks
- Sink drain assemblies
- Tailpieces
- P-traps
- Pop-up drain rods
- Overflow channels
- Pipe openings through drywall, tile, cabinet backs or floors
Each component creates a potential moisture path.
A leak does not need to produce a large puddle. A few drops released each time the sink is used can run along a pipe, soak into an unfinished cabinet edge or collect beneath stored toiletries.
Because the vanity doors stay closed most of the time, evaporation is slow. Airflow is limited. The cabinet may remain damp even when the bathroom itself feels dry.
The pattern is usually straightforward:
A water source wets a building material. The material stays damp. Mold develops.
Cleaning visible spots only addresses the last step.
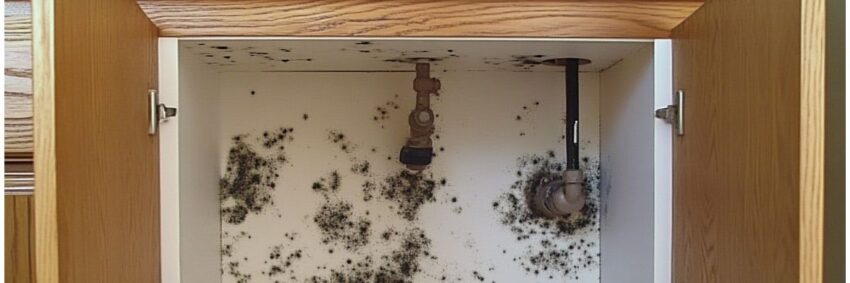
Signs of Mold or Water Damage Beneath a Vanity
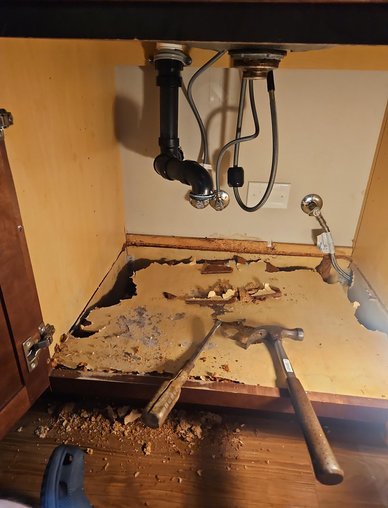
Remove everything from the vanity before inspecting it.
Use a flashlight to examine the cabinet floor, rear panel, wall openings, supply valves and drain connections.
Visible Spots or Discolouration
Mold may appear black, green, grey, white or brown.
Look for:
- Speckled growth around pipe openings
- Dark staining on the cabinet back
- Fuzzy or powdery material
- Discolouration beneath the P-trap
- Growth along cabinet seams
- Stains near the toe kick
- Marks where the vanity meets the wall
Colour alone cannot identify the species or tell you how serious the issue is.
This is also different from black mold and slime inside a sink drain. Dark residue inside a drain is often associated with biofilm, soap residue, hair and organic buildup. Mold on the cabinet, drywall or pipe opening points to moisture affecting building materials outside the drain system.
For a deeper explanation of residue within the plumbing itself, see UMC’s guide to mold inside a sink drain.

Swollen or Distorted Cabinet Material
Particleboard and MDF commonly swell after absorbing water.
Warning signs include:
- Raised cabinet edges
- Bubbling laminate
- A soft cabinet floor
- Crumbling material around pipe cut-outs
- Warped shelves
- A sagging vanity base
- Delamination at corners
Swelling means moisture entered the material.
Even when the surface feels dry, the porous core may have lost strength or retained contamination.
A Musty Odour
A persistent earthy smell may indicate damp material or concealed mold.
The odour may become stronger when you:
- Open the cabinet
- Run hot water
- Remove stored towels
- Pull out a drawer
- Touch the drywall around a pipe opening
A musty smell without visible growth can justify a closer moisture investigation.
Rust, Mineral Deposits or Corrosion
White deposits, green-blue staining, rust or corrosion around a fitting may reveal repeated wetting.
The leak may not be active during a quick visual check. Some connections drip only when:
- The faucet is running
- The basin is full
- The drain is released
- A connector moves
- The shutoff valve is turned
- Hot water causes a fitting to expand
Damp Flooring or Baseboards Beside the Vanity
Water does not always stay inside the cabinet.
It may travel:
- Beneath the vanity base
- Behind the toe kick
- Into the drywall
- Along the subfloor
- Under vinyl, laminate or tile
- Through a floor opening to the ceiling below
Soft flooring, lifted seams or staining beside the cabinet may indicate mold beneath flooring materials rather than a problem limited to the vanity interior.
Why Mold Grows Around Plumbing Penetrations
A plumbing penetration is an opening made for a water line, drain, vent or fixture connection to pass through a wall, cabinet or floor.
These openings are often hidden by escutcheon plates, trim rings or the vanity itself.
Mold around a penetration usually develops for one of four reasons.
1. A Plumbing Fitting Is Leaking
The most direct cause is water escaping from the plumbing system.
Potential leak points include:
- Faucet supply connectors
- Compression fittings
- Shutoff valve stems
- Valve-to-pipe connections
- Faucet mounting hardware
- Drain flange gaskets
- Slip-joint washers
- P-trap connections
- Pop-up drain assemblies
- Sink overflow components
A drain leak may only appear while water is flowing.
A supply leak can occur continuously because the line remains pressurized. Even a small leak can keep the cabinet or wall damp.
How to Check for a Small Leak
Dry every visible pipe and fitting.
Place a clean, dry paper towel beneath each connection. Run the cold water, followed by the hot water. Fill the sink partway, then release the drain while watching the trap and tailpiece.
Check the paper towel for new droplets.
Also inspect the underside of the countertop and faucet base. Water spilled around the faucet can pass through a failed seal and appear beneath the sink, making it look like a pipe is leaking.
Do not force, tighten or move badly corroded fittings. A weakened valve or connector may fail when disturbed.
2. A Cold Pipe Is Producing Condensation
Not every wet pipe is leaking.
Condensation forms when warm, humid bathroom air contacts a colder water line. Water vapour changes into liquid and collects on the pipe surface.
Condensation is more likely when:
- The bathroom remains humid after showers
- Cold water runs for long periods
- The pipe is uninsulated
- The vanity has little airflow
- The plumbing passes through a cold wall
- Indoor humidity rises in summer
- The cabinet is packed with stored items
Broad moisture along the length of a cold pipe often points to condensation.
Moisture beginning at one valve, nut or joint is more likely to indicate leakage.
The two problems can also occur at the same time.
Bathroom humidity may also produce mold on a bathroom ceiling, but ceiling mold and vanity mold should not automatically be treated as the same problem. Ceiling growth is commonly linked to steam and ventilation. Growth inside a vanity is more likely to involve a localized leak, cold pipe or concealed moisture path.
3. Water Is Entering Through the Sink or Countertop
Water used around the basin may bypass the visible plumbing.
Common entry points include:
- A failed seal between the sink and countertop
- Cracked caulking at the backsplash
- A loose faucet base
- Gaps around faucet holes
- An overflowing basin
- Water running behind a vessel sink
- A damaged countertop seam
Once water passes through the countertop, it can drip onto the cabinet floor or follow a supply line toward the wall opening.
This type of leak may occur during normal hand washing but remain absent when the pipes are inspected from below.
4. The Pipe Opening Connects the Cabinet to a Damp Wall Cavity
An oversized or unfinished pipe hole can expose the vanity interior to the wall cavity.
The opening does not create mold by itself. It can, however, allow moisture, odours and humid air to move between concealed spaces.
Growth around the opening can indicate:
- A pipe leaking inside the wall
- Condensation forming within the cavity
- Water descending from another fixture
- A raw drywall edge absorbing repeated splashes
- Moisture travelling from the floor
- Earlier water damage that was closed before drying
A trim ring may hide the opening without stopping moisture behind it.
Do not assume that caulking the visible gap will solve the problem. Sealing a penetration before checking the cavity can trap moisture and conceal further damage.
Common Moisture Patterns and What They Suggest
| Moisture pattern | Possible source |
|---|---|
| Wetness directly beneath a shutoff valve | Valve stem, compression fitting or supply connection leak |
| Droplets along the full cold-water line | Condensation |
| Staining below the drain assembly | Drain flange, tailpiece, overflow or P-trap leak |
| Damage beneath the faucet but above the trap | Faucet base, countertop opening or supply connector leak |
| Mold concentrated around a wall opening | Concealed leak, damp drywall edge or wall-cavity moisture |
| Swollen cabinet floor with no active drip | Previous leak, intermittent leak or trapped spill |
| Damage at the toe kick or nearby floor | Water migration beneath the vanity |
| Staining on the ceiling below | Drain, supply or waterproofing failure with vertical water movement |
These patterns provide clues. They are not proof.
Water can travel along pipes, framing and cabinet joints before becoming visible.
Is Black Mold Under a Bathroom Sink Dangerous?
Dark colour does not confirm Stachybotrys chartarum.
You cannot reliably identify a mold species by looking at it. The practical response should not depend on whether the growth is black, green, white or grey.
Health Canada states that indoor mold growth may pose a health hazard. People living in damp or moldy environments are more likely to experience:
- Eye, nose or throat irritation
- Coughing
- Wheezing
- Shortness of breath
- Worsening asthma symptoms
- Allergic reactions
The level of risk depends on the amount of growth, how long it has been present and the health of the person exposed.
People who may be more susceptible include:
- Infants and children
- Older adults
- Pregnant people
- People with asthma
- People with allergies
- People with weakened immune systems
Anyone concerned about symptoms should speak with a healthcare professional.
Do You Need Mold Testing?
Testing is not always necessary when mold is visible and the moisture source is obvious.
A swab may identify organisms on one sampled spot. It does not tell you how far moisture travelled behind the vanity or inside the wall.
Air sampling also has limits. Results can change with:
- Outdoor conditions
- Ventilation
- Room activity
- Cleaning
- Sampling location
- Sampling duration
Health Canada has not established a health-based numerical exposure limit for indoor mold.
A targeted professional mold inspection in Toronto may provide more useful information by answering practical questions:
- Is the cabinet currently wet?
- Where is the moisture coming from?
- Has water entered the wall or floor?
- Is the vanity structurally damaged?
- Does the cabinet need to be removed?
- Is controlled opening required?
- Did a previous repair leave contaminated material behind?
Testing may still be useful when the source is unclear, documentation is required or an independent consultant recommends sampling as part of a defined investigation.
Can Mold Under a Vanity Be Cleaned Without Removing the Cabinet?
Sometimes.
The correct approach depends on the material, affected area and depth of damage.
A Small Surface Area May Be Manageable When:
- The moisture source has been found and repaired
- The affected area is limited
- The surface is hard and structurally sound
- The cabinet is not swollen
- No musty odour is coming from the wall
- Growth does not continue into a pipe opening
- The area can be cleaned and fully dried
- No high-risk occupant will perform the cleanup
The City of Toronto states that a small area measuring one square metre or less can generally be cleaned with household detergent, followed by quick and thorough drying. Gloves, eye protection and an appropriate mask are recommended.
Cabinet Removal or Selective Demolition May Be Needed When:
- MDF or particleboard has swollen
- The cabinet floor has softened
- Mold has entered porous material
- Growth continues behind the cabinet back
- The vanity blocks access to the leak
- The drywall is wet or deteriorated
- The floor beneath the cabinet is affected
- The toe kick is soft
- Odour remains after cleaning
- Mold returns after the plumbing repair
The United States Environmental Protection Agency advises that moldy absorbent or porous materials may need to be discarded because growth can enter spaces that are difficult or impossible to clean completely.
How to Address a Small, Accessible Area
Do not begin by spraying chemicals into the cabinet.
Start with the water source.
Step 1: Stop the Moisture
Shut off the local valve if an active supply leak is present.
Have damaged connectors, valves, seals, washers or drain fittings repaired. Correct failed countertop seals and investigate moisture entering from the wall or floor.
When a plumbing failure has affected more than the cabinet surface, follow a broader water damage restoration checklist rather than treating the issue as a simple cleaning task.
Step 2: Empty the Cabinet
Remove:
- Toiletries
- Towels
- Paper products
- Cleaning supplies
- Cardboard
- Storage bins
Discard water-damaged disposable items.
Clean salvageable non-porous containers before returning them to the vanity.
Step 3: Protect the Work Area
Keep children, pets and susceptible occupants away.
For a limited cleanup, use:
- Protective gloves
- Eye protection
- An appropriate particulate respirator
- Clothing that can be washed after the work
Avoid dry brushing or aggressive scraping. These actions can release particles into the room.
Step 4: Clean Hard, Sound Surfaces
Use detergent and water on durable surfaces that remain structurally sound.
The goal is to physically remove the residue, not merely wet or lighten it.
Do not mix bleach with:
- Ammonia
- Vinegar
- Acids
- Toilet cleaners
- Other cleaning chemicals
Mixing products can create dangerous gases.
Step 5: Remove Material That Cannot Be Restored
Swollen particleboard, crumbling MDF, moldy paper-faced drywall and deteriorated cabinet backing may need to be removed.
Bag debris before carrying it through occupied areas.
Larger or concealed projects may require containment, negative air control and removal procedures suited to the contamination level.
Step 6: Dry the Area Fully
Cleaning is incomplete until the material is dry.
Use appropriate ventilation and dehumidification.
Do not aim a powerful fan directly across active mold before the area has been cleaned or contained. Air movement can spread particles into the bathroom and adjacent rooms.
Step 7: Reinspect Before Closing the Vanity
Confirm that:
- The plumbing stays dry during use
- No musty odour remains
- The cabinet floor is firm
- The drywall is dry
- Damaged porous material has been removed
- The pipe opening does not hide additional growth
- Adjacent flooring shows no deterioration
Do not reinstall a cabinet panel or seal a penetration while the assembly remains wet.
Why Bleach Is Not a Complete Solution
Bleach may lighten dark staining.
That does not prove the underlying moisture problem has been corrected or that contamination inside porous material has been removed.
A reliable repair follows this order:
- Find the moisture source.
- Repair the leak or condensation issue.
- Remove contamination from cleanable surfaces.
- Remove unsalvageable porous material.
- Dry the assembly.
- Confirm that the area remains dry.
Mold that keeps returning is usually not a cleaner problem. It is a moisture-control problem.
How Professionals Investigate Mold Behind a Vanity
A professional assessment should focus on moisture location and material condition, not simply confirm that a dark spot looks like mold.
The investigation may include:
- Detailed visual inspection
- Moisture readings on the cabinet, drywall and floor
- Plumbing observation while the fixture is operating
- Examination of supply and drain connections
- Inspection through removable drawers or panels
- Borescope inspection through an appropriate access point
- Infrared imaging
- Selective removal of damaged materials
- Inspection of the subfloor or wall cavity
- Documentation of the source and affected area
Infrared imaging identifies temperature differences. It does not see mold.
Any suspect pattern should be verified through moisture measurements and direct inspection.
When to Call a Mold Remediation Professional
Professional help is appropriate when:
- Mold extends behind the vanity
- The wall or floor remains wet
- The cabinet is deteriorated
- The source cannot be identified
- Growth returns after cleaning
- A strong odour remains
- Water has affected more than one room
- Sewage or contaminated water is involved
- The ceiling below shows staining
- Demolition will disturb a larger affected area
- A susceptible person lives in the home
Toronto Public Health recommends professional mold remediation for extensive contamination measuring four square metres or more.
A smaller area may also require professional help when it is concealed, difficult to access or connected to a wall cavity.
The final cost of mold removal in Toronto will depend on access, affected materials, containment needs and the extent of removal. UMC’s mold removal cost calculator can provide a preliminary range, but concealed vanity damage normally requires an inspection before the scope can be confirmed.
Toronto-Specific Considerations
Older Toronto Homes
Older properties may contain:
- Galvanized supply lines
- Ageing copper plumbing
- Plaster walls
- Layered flooring
- Previous plumbing alterations
- Oversized pipe openings
- Cabinets installed over earlier water damage
A newer vanity can conceal an older leak path.
Condominiums
In a Toronto condominium, water near a vanity may originate from:
- Plumbing inside the unit
- A shared riser
- The unit above
- A common wall
- A building drainage component
Document the damage and contact property management when shared plumbing may be involved.
Opening walls or altering common systems may require authorization.
Basement Bathrooms
Basement vanities may be affected by both plumbing moisture and elevated lower-level humidity.
Cold supply lines, concrete floors and limited airflow increase condensation risk. Water may also spread beneath finished flooring before becoming visible.
Rental Units
Toronto tenants should report leaks, dampness and mold to the landlord or property manager in writing.
Include:
- The date
- Photos
- The affected location
- Any active dripping
- Odour
- Cabinet or flooring damage
- Previous repair attempts
If the issue is not resolved, the City of Toronto advises tenants to contact 311 regarding property-standard concerns.
How to Prevent Mold From Returning
Prevention should focus on moisture control, access and routine inspection.
Inspect the Plumbing Regularly
Every few months:
- Run the faucet while watching each connection
- Fill and drain the basin
- Touch dry paper towel to each fitting
- Check for corrosion
- Inspect beneath stored items
- Look at the cabinet floor and back panel
Avoid Overfilling the Cabinet
Crowded storage blocks airflow and hides leaks.
Keep towels, paper products and cardboard away from plumbing connections.
A washable tray can help contain minor spills, but do not let the tray conceal an active leak.
Control Bathroom Humidity
Use the exhaust fan while bathing and continue running it until excess moisture has cleared.
General room humidity can contribute to vanity condensation as well as ceiling growth. UMC’s guide to preventing mold growth in high-moisture bathrooms explains how ventilation, drying and fixture maintenance work together and how to make sure attic mold doesnt returns later..
Health Canada recommends maintaining indoor relative humidity between 30 and 50 percent where practical.
A basic hygrometer can help identify prolonged humidity.
Insulate Condensation-Prone Pipes
Closed-cell pipe insulation may reduce condensation on accessible cold-water lines.
The pipe should be dry and free of active leaks before insulation is installed.
Never use insulation to cover a wet valve or leaking fitting.
Maintain Sink and Countertop Seals
Inspect:
- The faucet base
- Sink rim
- Backsplash joint
- Countertop seams
- Overflow opening
Replace deteriorated sealant with a compatible bathroom product.
Finish Plumbing Penetrations Properly
Once the cavity has been inspected and confirmed dry, openings may be finished using suitable:
- Escutcheon plates
- Trim rings
- Sealants
- Fire-stopping materials
- Acoustic materials
The correct product depends on the wall or floor assembly.
Do not seal over active mold, wet drywall or an unresolved leak.
Key Takeaway
Mold under a bathroom vanity is a moisture-tracing problem first and a cleaning problem second.
The visible growth shows where the material stayed damp. It may not show where the water started or how far it travelled.
A lasting solution follows this sequence:
Inspect the plumbing. Trace the moisture path. Repair the source. Remove damaged material. Clean salvageable surfaces. Dry the assembly. Confirm that it stays dry.
When the vanity, drywall or flooring is soft, swollen or persistently musty, surface cleaning is unlikely to be enough.
🚨 Get Emergency Mold Help in Toronto & the GTA
Don’t let mold compromise your air quality or your safety. Contact Ultimate Mold Crew today for certified mold removal, complete remediation, and post-clearance verification.
📞 Call Us: 647-985-2739
📍 Serving: Toronto, Scarborough, Mississauga, Markham, and surrounding GTA- contact Ultimate Mold Crew.
Why is mould growing around the pipes under my bathroom sink?
Mould around bathroom pipes usually indicates repeated moisture from a leaking fitting, condensation on a cold-water line, water entering through the countertop or dampness inside the wall. The pipe opening may expose absorbent drywall or cabinet edges that stay wet longer than finished surfaces.
Can a small plumbing leak cause mould?
Yes. A slow or intermittent leak can keep particleboard, drywall or wood damp without producing a visible puddle. Enclosed vanity cabinets also have limited airflow, which slows drying.
How can I tell whether a pipe is leaking or sweating?
Dry the pipe and fittings completely. Run the fixture while observing each connection. Moisture beginning at a specific joint suggests leakage. Droplets forming broadly along a cold pipe suggest condensation. A plumber or moisture professional may be needed when the pattern remains unclear.
Should gaps around bathroom pipes be sealed?
Openings can be finished after the plumbing and surrounding cavity have been inspected and confirmed dry. Do not seal over active mould, wet drywall or a hidden leak. Some penetrations may also require specific fire-stopping, acoustic or building-system materials.
Does the vanity need to be removed?
Removal may be unnecessary for a very small, accessible surface issue on sound material. It becomes more likely when the cabinet is swollen, the wall behind it is affected, the leak cannot be accessed or water has travelled beneath the vanity.
Can mould grow behind a vanity without being visible?
Yes. Growth can develop on the rear of the cabinet, paper facing of drywall, wall framing, subfloor or underside of the vanity base. A musty odour, recurring staining or elevated moisture can justify further inspection.
Can I paint over mould inside the cabinet?
No. Paint does not correct the leak or remove contamination. Coating damp or mouldy material can conceal the problem and delay proper repairs.
Is mould under the bathroom sink covered by insurance?
Coverage depends on the policy and the cause. Sudden and accidental water discharge may be treated differently from long-term seepage, poor maintenance or gradual deterioration. Document the damage, stop further water loss and contact the insurer promptly.
Will replacing the vanity solve the problem?
Only when the moisture source has also been corrected and affected wall or flooring materials have been addressed. Installing a new vanity over damp drywall or subfloor can conceal the same problem again.
When should I contact a professional?
Seek professional help when the growth is concealed, recurring or extensive, when porous materials are damaged, when sewage is involved, or when the wall and floor remain wet after the plumbing repair.
- Entities Article entity: Mold Under Bathroom Vanity and Around Plumbing Penetrations
- Primary entity: Indoor mould
- Location entity: Bathroom vanity
- Cause entities: Plumbing leak, pipe condensation, failed sealant, water intrusion
- Affected-material entities: Particleboard, MDF, drywall, plywood, subfloor
- Inspection entities: Moisture meter, visual inspection, infrared imaging, selective opening
- Remediation entities: Source correction, material removal, surface cleaning, structural drying
- Geographic entity: Toronto, Ontario, Canada
- Organization entity: Ultimate Mold Crew Inc.
Authoritative Sources
- Health Canada, Guide to Addressing Moisture and Mould Indoors
https://www.canada.ca/en/health-canada/services/publications/healthy-living/addressing-moisture-mould-your-home.html - Health Canada, Mould: Reduce Humidity, Moisture and Mould
https://www.canada.ca/en/health-canada/services/air-quality/indoor-air-contaminants/reduce-humidity-moisture-mould.html - Health Canada, Residential Indoor Air Quality Guideline: Moulds
https://www.canada.ca/en/health-canada/services/publications/healthy-living/residential-indoor-air-quality-guideline-moulds.html - City of Toronto, Mould
https://www.toronto.ca/community-people/health-wellness-care/health-programs-advice/mould/ - City of Toronto, Property Standards
https://www.toronto.ca/city-government/public-notices-bylaws/bylaw-enforcement/property-standards-keep/ - United States Environmental Protection Agency, A Brief Guide to Mold, Moisture and Your Home
https://www.epa.gov/mold/brief-guide-mold-moisture-and-your-home - United States Environmental Protection Agency, Mold Cleanup in Your Home
https://www.epa.gov/mold/mold-cleanup-your-home - United States Environmental Protection Agency, What Are the Basic Mold Cleanup Steps?
https://www.epa.gov/mold/what-are-basic-mold-cleanup-steps - Canadian Centre for Occupational Health and Safety, Indoor Air Quality: Moulds and Fungi
https://www.ccohs.ca/oshanswers/chemicals/iaq/iaq_mould.html
