

Updated on 21-Jul-2026
If you’ve noticed a musty smell on your top floor, seen dark staining on your roof sheathing, or found frost building up on attic nails in winter, you may be dealing with attic mold — one of the most common and most overlooked mold problems in Toronto homes.
Unlike bathroom or basement mold, attic mold grows out of sight. By the time most homeowners discover it, the growth has already spread across roof sheathing, rafters, and insulation.
The good news: attic mold is treatable, and when the underlying moisture source is corrected, it does not have to come back. Get rid of mold today, all you need to do is, just choose the best mold removal services in Toronto GTA.
This guide covers everything Toronto homeowners need to know — why attic mold is so common in our climate, the seven most frequent causes, the warning signs to look for, whether it’s dangerous, and exactly how professional attic mold removal in Toronto works.
Table of Contents
Why Attic Mold Is So Common in Toronto Homes
The Cold-Climate Condensation Problem
Toronto sits in a cold-climate zone where winter temperatures regularly drop below -10°C. During the heating season, warm, moisture-laden air from your living space rises and escapes into the attic through small gaps and air leaks. When that warm air contacts the cold underside of your roof sheathing, the moisture condenses — just like water beading on a cold glass.
That condensation wets the wood. And wet wood, in a dark, poorly ventilated space, is exactly the environment mold needs to colonize. This is why attic mold in Toronto is overwhelmingly a winter-driven problem, even though most homeowners don’t discover it until spring or summer.
Toronto’s Housing Stock Makes It Worse
Much of Toronto and the GTA’s housing stock was built between the 1950s and 1990s, an era when attic ventilation standards were less rigorous and vapor barriers were inconsistent. Many older homes have since been renovated — new bathrooms added, kitchens upgraded, pot lights installed in ceilings — often without corresponding upgrades to attic ventilation or air sealing.
Cathedral ceilings, common in additions and custom builds, are particularly vulnerable because they leave little or no attic cavity for air to circulate. Even newer builds are not immune: tight construction envelopes can trap moisture if mechanical ventilation is inadequate.
Seasonal Drivers
- Winter: Frost accumulates on sheathing and nails as humid indoor air meets freezing roof surfaces. When temperatures rise, that frost melts and wets the wood.
- Spring: Snow melt and ice dam runoff can introduce bulk water through roof penetrations or damaged flashing.
- Summer: High outdoor humidity (Toronto regularly exceeds 70% relative humidity in July and August) can enter the attic through soffit vents and condense on cooler surfaces, especially in air-conditioned homes.
In our experience inspecting hundreds of Toronto attics, the majority of attic mold cases trace back to one or more of the seasonal moisture patterns above — not a single dramatic event like a roof leak.
Environment and Climate Change Canada’s climate normals can support a broader statement that Toronto experiences humid summer conditions, but outdoor humidity alone does not prove that it is causing roof-deck condensation.
What Causes Mold in the Attic?
1. Bathroom Exhaust Fans Vented Into the Attic
This is the single most common cause we find in Toronto homes. Many bathroom fans are ducted directly into the attic cavity rather than through the roof or a gable wall to the exterior. Every shower pumps warm, humid air straight into the space where it condenses on sheathing.
If your bathroom fan terminates inside the attic, this is almost certainly contributing to mold growth — and it needs to be re-routed outside.
2. Blocked or Insufficient Soffit and Roof Ventilation
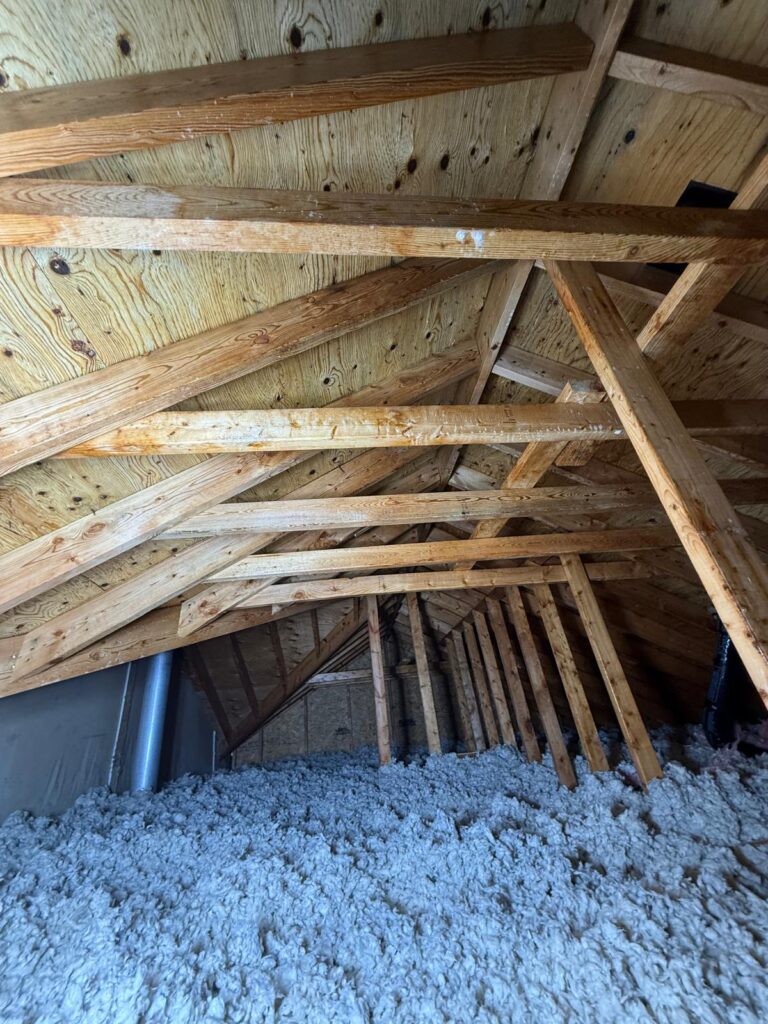
Attics rely on a balance of intake (soffit vents) and exhaust (ridge vents, roof vents, or gable vents) to move air through the space. When soffit vents are blocked by insulation, painted over, or simply undersized, air stagnates. Moisture has nowhere to go.
We frequently find attics where blown-in insulation has been piled over soffit vents, completely cutting off intake airflow. Proper baffles (ventilation chutes) at the eaves solve this, but they are often missing in older homes.
More Roof Vents Will Not Fix Every Moisture Problem
Attic ventilation provides a drying path, but it cannot compensate for a bathroom fan discharging directly into the attic or a ceiling with major air leaks.
A contractor who recommends additional roof vents without checking bathroom ducts, the attic hatch, pot lights, plumbing stacks and insulation-covered soffits may be treating the symptom rather than the source.
3. Attic Bypasses and Air Leaks
Every penetration through the ceiling — attic hatches, recessed pot lights, plumbing stacks, electrical wiring, chimney chases — is a potential air leak. These bypasses let warm, humid indoor air stream into the attic continuously during the heating season.
An unsealed attic hatch alone can move a surprising volume of moist air. Pot lights, unless they are airtight-rated (IC-AT), are notorious leakers.
4. Roof Leaks, Ice Dams, and Snow-Melt Intrusion
Damaged or aging shingles, failed flashing around chimneys and vents, and ice dams at the eaves can all introduce bulk water into the attic. Ice dams are especially common in Toronto’s older neighborhoods where attic insulation is uneven and heat loss melts snow unevenly across the roof.
Unlike condensation-driven mold (which tends to be diffuse across sheathing), leak-driven mold is often localized near the point of water entry — a useful diagnostic clue.
5. Inadequate or Missing Insulation and Vapor Barrier
Insulation keeps the warm side of the ceiling warm and the attic side cold. When insulation is thin, uneven, or missing, the ceiling surface cools and condensation forms on the interior side — or warm air leaks through gaps and condenses in the attic.
A continuous vapor barrier (typically polyethylene sheeting) on the warm side of the ceiling further limits moisture migration. Many older Toronto homes have no vapor barrier at all, or one that was compromised during renovations.
Air Barrier vs. Vapour Barrier: The Difference Matters
An air barrier and a vapour barrier do different jobs.
A vapour barrier slows the molecular movement of water vapour through materials. An air barrier controls the movement of humid air through cracks, gaps and openings. In a cold Canadian climate, air leakage can transport substantially more moisture into a roof assembly than vapour diffusion.
This is why an attic with polyethylene below the insulation can still develop frost and mould. Gaps around the attic hatch, plumbing stacks, partition walls, electrical penetrations and non-airtight light fixtures can bypass the vapour barrier entirely.
6. High Indoor Humidity
Running a humidifier to combat winter dryness is understandable — but if indoor relative humidity climbs above 40% during cold weather, the excess moisture will find its way into the attic. Cooking, showering, drying clothes indoors, and even houseplants all add moisture.
A hygrometer reading of 45–55% in your living space during January is a strong signal that your attic is at risk.
7. New Insulation Installed Over Existing Mold
This is a mistake we see regularly. A homeowner notices mold on sheathing, assumes insulation will “fix” it, and has new insulation blown in on top. The mold is now hidden, still growing, and the added insulation can actually worsen the problem by reducing the drying potential of the sheathing.
Insulation does not kill mold. It does not address the moisture source. And it makes future inspection and remediation significantly harder and more expensive.
What the Location of Attic Growth Can Tell You
The location of staining or growth does not prove the cause, but it can narrow the inspection.
| Pattern observed | Possible explanation | What should be checked next |
|---|---|---|
| Frost and widespread spotting across several roof planes | Indoor humidity and ceiling air leakage | Attic hatch, pot lights, wall intersections, plumbing stacks and winter humidity |
| Heavy growth around a bathroom duct | Disconnected, leaking or poorly insulated exhaust duct | Entire duct route, exterior termination and duct insulation |
| A concentrated patch below a chimney, valley or plumbing vent | Roof or flashing leak | Exterior roofing after rain or spring thaw |
| Darkened eaves with blocked soffits | Restricted intake ventilation | Baffles, insulation placement and soffit openings |
| Ice dams with wet lower sheathing | Heat loss, uneven insulation or air leakage near the eaves | Insulation voids, bypasses and roof drainage |
| Growth discovered immediately after new insulation | Pre-existing contamination or blocked ventilation | Conditions beneath the insulation and the soffit ventilation path |
| One roof slope is substantially worse than another | Different drying, wind exposure, shading or ventilation conditions | Roof orientation, vent distribution and localized air-leakage routes |
Signs You Have Attic Mold
Attic mold is a silent problem. Most Toronto homeowners never go into their attic, so growth can progress for years before it’s noticed. Here are the signs to watch for:
Visible Growth on Sheathing, Rafters, and Insulation
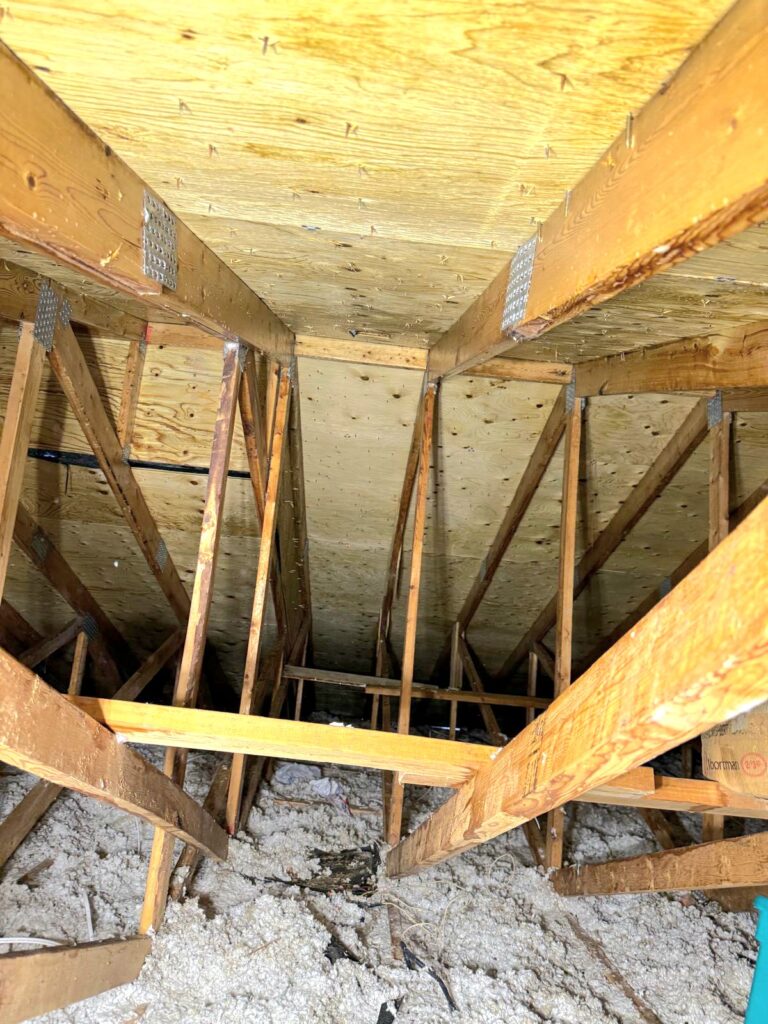
The most obvious sign. Mold on roof sheathing typically appears as black, dark green, or white speckling or staining on the underside of the plywood or OSB. In advanced cases, growth covers large areas and may extend onto rafters, trusses, and the top surface of insulation.
Black speckling on sheathing is often Cladosporium or Aspergillus; white, cottony growth may be Penicillium. Color alone does not confirm the species — only lab analysis can do that — but any visible growth in an attic warrants professional attention.
Musty Smell on the Top Floor
A persistent earthy, musty odor on the upper floor of your home, especially near ceiling fixtures or the attic hatch, is a strong indicator of mold growth above. The smell is caused by microbial volatile organic compounds (mVOCs) released by active mold colonies.
Frost or Moisture on Nails and Sheathing in Winter
If you inspect your attic on a cold day and see frost coating the nail tips or a film of moisture on the sheathing, you have a condensation problem. That moisture is the precursor to mold — and in many cases, mold is already present on the reverse side or in areas you cannot easily see.
Staining, Warping, or Delaminating Sheathing
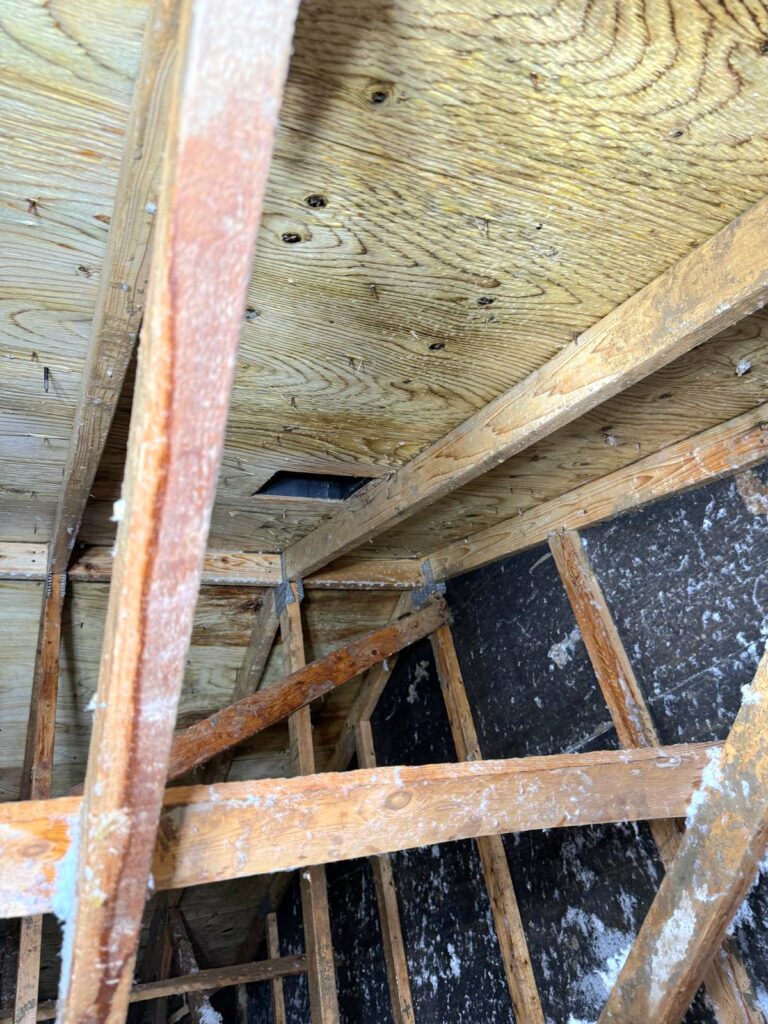
Dark water stains, warped or buckling plywood, or sheathing that is soft to the touch or delaminating at the edges indicates chronic moisture exposure. At this stage, structural integrity may be compromised, and remediation becomes more involved.
Unexplained Allergy or Respiratory Symptoms Upstairs
If family members experience nasal congestion, sneezing, itchy eyes, or coughing that improves when they leave the house — and symptoms are worse on the top floor — airborne mold spores migrating down from the attic may be the cause.
Is Attic Mold Dangerous? Health and Structural Risks
Can Attic Mould Affect the Air Inside Your Home?
During a Toronto winter, stack effect normally pushes warm indoor air upward through openings around attic hatches, ceiling fixtures, wiring, plumbing penetrations and partition walls. This upward airflow is one of the main ways household moisture reaches a cold attic.
Prolonged exposure to elevated indoor mold spore levels can trigger allergic reactions, asthma exacerbations, sinus congestion, and respiratory irritation. Immunocompromised individuals, young children, and the elderly are at higher risk. While most common attic molds (Cladosporium, Penicillium, Aspergillus) are allergenic rather than highly toxigenic, chronic exposure in a poorly ventilated home is a legitimate health concern that should not be dismissed.
The movement of contaminants from the attic into occupied rooms is more complex. Wind, bathroom and kitchen exhaust equipment, HVAC pressure imbalances, opening the attic hatch and disturbing contaminated materials can change local airflow or release settled particles. An attic should therefore be treated as part of the home’s connected air and building-envelope system, but it is inaccurate to assume that stack effect continuously pulls attic air downward.
Health Canada associates damp and mouldy indoor environments with eye, nose and throat irritation, coughing, wheezing, shortness of breath and worsening asthma symptoms. These symptoms are not specific to mould and cannot, by themselves, prove that an attic is the source. Anyone concerned about health symptoms should discuss them with a healthcare professional while the building is inspected for dampness, visible growth and air-leakage pathways.
Health Canada supports the health effects in this replacement
Structural: Wood Rot and Compromised Sheathing
Mold itself does not rot wood — but the same chronic moisture that supports mold growth also supports wood-decay fungi. Over time, prolonged wetting can cause roof sheathing to soften, delaminate, and lose structural integrity. Rafters and trusses can be affected in severe cases.
We have inspected Toronto attics where sheathing was so degraded from years of undetected moisture that it needed full replacement — a repair costing several times what early remediation would have.
Why Attic Mold Goes Undetected
The attic is the least-visited space in most homes. There is no daily reason to go up there. Growth develops slowly, often over multiple seasons, and the first visible signs may be hidden behind insulation or on the far side of the roof plane. By the time a homeowner notices a smell or a stain on the ceiling, the problem is usually well established.
This is why we recommend an annual attic visual check — especially in homes built before 2000, homes with recent bathroom or kitchen renovations, and any home where a musty smell has been noticed on the upper floor.
DIY vs. Professional Attic Mold Removal
Quick Homeowner Self-Check
Grab a flashlight and safely access your attic (step only on joists, never the ceiling drywall). Look for:
- ☐ Black, green, or white speckling on the underside of roof sheathing
- ☐ Frost or moisture on nails or wood surfaces (winter)
- ☐ Dark staining or warped sheathing
- ☐ Bathroom fan ducts terminating inside the attic (not exiting the roof)
- ☐ Soffit vents blocked by insulation
- ☐ Musty odor
- ☐ Mold on insulation or stored items
If you check two or more boxes, book a professional attic mold inspection.
Best times to inspect an attic
An attic can look dry on the day it is inspected even when it has a recurring moisture problem. The timing of the inspection can expose different failure patterns.
- During a winter cold snap: Look for frost on nails, fasteners and sheathing. This is one of the clearest times to identify warm-air leakage and excess indoor humidity.
- After prolonged rain: Check below roof penetrations, valleys, chimneys and flashing for isolated wet areas.
- During spring thaw: Look for wet eaves, ice-dam damage and water released as accumulated attic frost melts.
- After running a bathroom fan: Confirm that the duct remains connected, does not leak at joints and terminates outdoors.
- After insulation work: Verify that soffits remain open and baffles have not been crushed or buried.
A dry attic in July does not prove that the roof assembly remained dry during January.
When DIY Is Not Safe
Small, surface-level mold on a non-porous surface (like a metal vent pipe) can sometimes be cleaned by a homeowner with appropriate PPE. But attic mold presents specific risks that make DIY inadvisable in most cases:
- Containment: Disturbing mold without containment releases millions of spores into the air, which then settle throughout the home. Without negative air pressure and polyethylene containment barriers, cleaning the attic can contaminate the rest of the house.
- Height and access: Attics are cramped, poorly lit, and involve working at height on joists. Falls through the ceiling are a real risk.
- Electrical hazards: Exposed wiring, junction boxes, and recessed light fixtures are common in attics.
- Incomplete removal: Surface cleaning without addressing the moisture source guarantees regrowth.
Why Bleach or Vinegar Is Not a Complete Attic Mould Solution
This is one of the most persistent myths in mold remediation. Bleach (sodium hypochlorite) is mostly water. On porous surfaces like wood sheathing, the water penetrates the wood and feeds the mold roots (hyphae) while the chlorine stays on the surface and evaporates. You may bleach the visible staining, but the organism remains alive inside the wood.
Vinegar (acetic acid) has mild antifungal properties but is not effective against established colonies on porous materials. Neither product addresses the moisture source, which is the actual problem.
Effective remediation requires contaminated material to be physically cleaned or removed, the work area to be controlled and the source of moisture to be corrected.
Untreated wood, insulation and other porous attic materials are more difficult to clean than glass, metal or plastic. Heavy growth, damaged insulation or deteriorated wood may require removal, abrasive cleaning or replacement rather than surface spraying.
Vinegar is also not a substitute for professional remediation. Household vinegar has not been established as a complete remediation system for contaminated attic assemblies. Neither vinegar nor bleach corrects a disconnected bathroom duct, roof leak, ceiling air leak, blocked soffit or excessive indoor humidity.
Professional remediation uses HEPA vacuuming, abrasive cleaning (sanding, media blasting, or wire brushing) to physically remove growth from the wood surface, and EPA-registered antimicrobial treatments — followed by moisture-source correction.
What Professional Remediation Does Differently
Our professional mold remediation in Toronto follows the IICRC S520 Standard for Professional Mold Remediation, which prescribes:
- Containment of the work area to prevent cross-contamination
- Negative air pressure with HEPA-filtered air scrubbers
- Physical removal of contaminated materials
- HEPA vacuuming and cleaning of all surfaces
- Antimicrobial treatment
- Moisture-source correction
- Post-remediation verification (clearance testing)
This process removes the mold, addresses the cause, and verifies the result — something no DIY approach can replicate.
Our Toronto Attic Mold Remediation Process (Step-by-Step)
Here is exactly what a professional attic mold removal project looks like, based on the IICRC S520 protocol we follow at Ultimate Mold Crew:
Step 1: Visual Inspection, Moisture Mapping and Scope Development
The assessment begins with the building, not the laboratory.
The inspector examines roof sheathing, rafters, trusses, insulation, soffits, roof vents, exhaust ducts and common ceiling penetrations. Moisture readings and, where useful, thermal imaging help distinguish current wetness from older staining. The roof exterior, flashing, ice-dam history, indoor humidity and recent renovations should also be considered.
Air or surface sampling is not automatically required when visible mould and its moisture source are already apparent. Targeted testing may be recommended when hidden contamination is suspected, an odour remains unexplained, the extent of the affected area is disputed, or a project-specific remediation protocol requires laboratory data.
Step 2: Containment and Negative Air Pressure
The affected attic zone is sealed with polyethylene sheeting. A HEPA-filtered negative air machine (air scrubber) is installed to create negative pressure inside the containment, ensuring that any spores disturbed during removal are pulled into the HEPA filter rather than escaping into the home.
Step 3: Source Removal of Affected Materials
Contaminated insulation, vapor barrier, and any unsalvageable building materials are removed, bagged inside containment, and disposed of according to local regulations. If sheathing is structurally compromised, it is cut out and replaced.
Step 4: HEPA Vacuuming, Abrasive Cleaning, and Antimicrobial Treatment
All remaining wood surfaces — sheathing, rafters, trusses, joists — are HEPA-vacuumed to remove loose spores, then abrasively cleaned (sanding, wire brushing, or dry-ice/soda blasting for heavy growth) to physically remove embedded hyphae.
Where a cleaning agent, antimicrobial coating or disinfectant is appropriate, the contractor should use a product authorized for sale in Canada, suitable for the material and applied according to its Canadian label. Chemical treatment should support physical removal and cleaning, not replace it.
The IICRC treats antimicrobial chemicals and coatings as potential remediation tools, not as a substitute for source removal. Health Canada now regulates qualifying products through its Canadian biocide framework.
Step 5: Fixing the Moisture Source
This is the step that separates remediation from cleaning. The underlying cause must be corrected: re-routing bathroom exhaust fans to the exterior, unblocking or adding soffit vents, sealing attic bypasses and air leaks, upgrading insulation and vapor barrier, or repairing roof leaks. Without this step, mold will return.
Step 6: Post-Remediation Evaluation and, When Appropriate, Independent Verification
Successful remediation is not determined by one air-sample number. The completed area should be visibly clean, dry and free of remediation debris. The original moisture source should be corrected or covered by a documented repair plan. Removed materials should be replaced only after acceptable drying conditions have been confirmed.
For extensive projects involving structural materials, Health Canada recommends considering a separate company or qualified environmental professional for post-remediation clearance. Air sampling may form part of that evaluation when it was included in the original protocol, but visual cleanliness, dryness, source correction and documentation remain essential.
Health Canada recommends considering separate clearance for extensive structural work, rather than presenting air sampling as mandatory for every project
What Drives the Price Of Attic Mold Removal
Attic mold removal costs vary significantly based on the specifics of your project. The main factors:
- Attic square footage and accessibility — larger or harder-to-access attics take more time and materials.
- Severity and extent of growth — surface speckling on sheathing is far less involved than growth that has penetrated insulation and framing.
- Insulation removal and replacement — if insulation is contaminated, it must be removed and replaced, adding material and labor cost.
- Moisture-source corrections — re-routing exhaust fans, adding ventilation, sealing air leaks, or repairing roof leaks add scope.
- Sheathing replacement — structurally compromised sheathing must be cut out and replaced, which is a carpentry task on top of the remediation.
- Testing and verification — pre- and post-remediation air sampling adds cost but provides essential documentation.
As a general guide, straightforward attic mold remediation in a Toronto home (surface treatment, no major structural repair) typically falls in the low-to-mid four figures. Projects involving insulation removal, ventilation corrections, or sheathing replacement will be higher.
What a quote should include: a written scope of work, containment and HEPA filtration details, materials to be removed and replaced, moisture-source corrections, antimicrobial treatment, cleanup, and post-remediation clearance testing. Be cautious of quotes that omit containment or clearance testing — these are corner cuts that compromise the result.
Insurance considerations: Some homeowner policies cover mold remediation when it results from a covered peril (e.g., a sudden roof leak or plumbing failure). Mold caused by long-term condensation, poor ventilation, or deferred maintenance is typically excluded. Document the cause and keep all inspection and remediation reports for your claim.
How to Prevent Attic Mold From Coming Back
Remediation removes the mold. Prevention keeps it from returning. The key is controlling the moisture that caused it in the first place:
Ventilation and Air Sealing
- Ensure bathroom, kitchen, and dryer exhaust fans vent to the exterior, not into the attic.
- Confirm soffit vents are clear and unblocked by insulation; install baffles if needed.
- Verify ridge, roof, or gable vents provide adequate exhaust.
- Seal attic bypasses: caulk or foam around plumbing stacks, wiring, pot lights, and the attic hatch. Weatherstrip and insulate the hatch.
Humidity Control
- Keep indoor relative humidity between 30–40% during winter and below 50% year-round. Use a hygrometer to monitor.
- Run bathroom fans during and for 20–30 minutes after showers.
- Use a range hood vented outside when cooking.
- Avoid running humidifiers above 40% RH in cold weather.
Insulation and Vapor Barrier
-
Have the insulation depth, distribution and thermal performance assessed against the home’s roof assembly and the requirements that apply to the planned work. Existing homes do not all require the same retrofit specification.
-
Do not add insulation until roof leaks, exhaust-duct problems, mould contamination and ceiling air leakage have been addressed. New insulation can conceal existing growth, obstruct soffit ventilation and make future remediation more difficult when it is installed without first correcting these conditions.
- Confirm a continuous vapor barrier exists on the warm side of the ceiling. If absent or damaged, consider adding one during a renovation.
NOTE-
- Natural Resources Canada similarly recommends correcting mould, rot and condensation problems before adding insulation.
- The 2024 Ontario Building Code came into effect on January 1, 2025, a single R-value should not be presented as the universal requirement for every existing Toronto attic.
Annual Attic Check
Once a year — ideally in late winter or early spring — take a flashlight into your attic and look for frost, moisture, staining, or new growth. Catching a problem early keeps remediation simple and inexpensive.
Why Choose Ultimate Mold Crew for Attic Mold Removal in Toronto

Ultimate Mold Crew is a Toronto-based, IICRC-certified mold inspection and remediation company serving Toronto and the GTA.
Here’s what sets our attic mold removal apart:
- IICRC S520-compliant process — every project follows the industry standard for professional mold remediation, with full containment, HEPA filtration, and antimicrobial treatment.
- Certified inspectors and technicians — our team is trained and certified in mold inspection, remediation, and indoor air quality assessment.
- Moisture-source diagnosis: We identify the conditions contributing to the attic problem and clearly document the corrective work required. The proposal specifies whether the correction is completed by our team or by an appropriate roofing, insulation, HVAC, electrical or ventilation contractor.
- Post-remediation evaluation: Every project includes documented inspection of the completed work. Independent clearance or laboratory testing can be arranged when required by the project protocol, property transaction, insurer or client.
- Before-and-after documentation — photo documentation of the remediation process for your records and for insurance or real estate purposes.
- Free attic mold inspection — if you suspect attic mold, we’ll inspect your attic, assess the situation, and provide a detailed remediation plan at no cost.
Service areas: Toronto, Mississauga, Vaughan, Richmond Hill, Markham, Scarborough, Etobicoke, Brampton, Aurora, Newmarket, and the surrounding GTA.
[Book Your Free Attic Mold Inspection →]
Frequently Asked Questions
How do I know if I have mold in my attic?
The most common signs are visible black, green, or white speckling on the underside of roof sheathing, a musty smell on the top floor, frost or moisture on nails and sheathing in winter, and unexplained allergy symptoms upstairs. The only way to confirm the species and concentration is a professional air and surface sampling test. If you notice any of these signs, book a free attic inspection.
Is attic mold dangerous to my health?
Attic mold can affect indoor air quality through the stack effect, which draws spores from the attic down into living spaces. Prolonged exposure to elevated mold spore levels can cause allergic reactions, respiratory irritation, sinus congestion, and asthma exacerbations, particularly in sensitive individuals. While most common attic molds are allergenic rather than highly toxic, any indoor mold growth should be addressed promptly.
Can I remove attic mold myself?
For very small, surface-level growth on non-porous materials, a homeowner with proper PPE (N95 respirator, gloves, goggles) may be able to clean the area. However, most attic mold involves porous wood sheathing, requires containment and HEPA filtration to prevent cross-contamination, and demands correction of the underlying moisture source. DIY cleaning without containment risks spreading spores throughout the home, and without fixing the moisture source, the mold will return. Professional remediation is strongly recommended for anything beyond a trivial patch.
How much does attic mold removal cost in Toronto?
Costs depend on attic size, severity of growth, whether insulation must be removed and replaced, what moisture-source corrections are needed, and whether sheathing replacement is required. Straightforward surface remediation typically falls in the low-to-mid four figures; projects with insulation removal, ventilation work, or structural repair will be higher. Always request a detailed written quote that includes containment, HEPA filtration, antimicrobial treatment, and post-remediation clearance testing.
Will attic mold come back after remediation?
Not if the moisture source is corrected. Professional remediation removes the mold and addresses the cause — ventilation deficiencies, air leaks, exhaust fan misrouting, insulation gaps, or roof leaks. If only the visible mold is cleaned without fixing the moisture problem, regrowth is virtually guaranteed. This is why moisture-source correction and post-remediation verification are essential parts of any proper remediation.
Does home insurance cover attic mold removal?
Home insurance coverage depends on the policy and the event that caused the damage. Policies may respond to sudden insured losses, such as certain broken-pipe or storm events, but generally do not cover predictable deterioration or routine maintenance. Mould should not be presented as automatically covered or automatically excluded. Contact the insurer before demolition and document the original water source, dates, photographs and emergency measures.
