Updated on 19-Jun-2026
This article focuses on the entire moisture pathway:
Roof Leak → Ceiling Damage → Attic Mold → Insulation Contamination → Structural Risk
A roof leak rarely stays a roof problem.
What starts as a small drip around a flashing, vent stack, skylight, or damaged shingle can quickly become a mold problem hidden inside ceilings, attic insulation, roof sheathing, and wall cavities.
Many Toronto homeowners first notice a brown ceiling stain. By the time that stain appears, moisture may have been present for weeks or months. Mold can begin growing on damp building materials within 24 to 48 hours when conditions are right. Moisture + organic material + limited airflow creates an ideal environment for fungal growth.
This guide explains exactly what happens after a roof leak, where mold develops, what damage to expect, when materials must be replaced, and how professional remediation differs from simply drying the area.
How Roof Leaks Cause Mold
A roof system is designed to keep moisture outside the building envelope.
When that barrier fails, water often enters areas homeowners cannot see.
Common leak points include:
- Missing shingles
- Damaged flashing
- Ice dams
- Roof vents
- Skylights
- Chimney penetrations
- Cracked seals
- Storm damage
- Aging roofing systems
Once water enters the attic, it may:
- Soak insulation
- Wet roof sheathing
- Saturate rafters and trusses
- Drip into ceiling cavities
- Damage drywall
- Increase indoor humidity
Moisture Migration Pathway
Roof Leak → Wet Sheathing → Damp Insulation → Ceiling Saturation → Mold Growth
The leak source and mold location are often different.
A homeowner may see mold on a bedroom ceiling while the actual roof leak sits several feet away above the attic insulation.
How Fast Does Mold Grow After a Roof Leak?
Mold does not need standing water.
It only needs moisture and a food source.
Materials commonly affected include:
- Drywall paper
- Wood framing
- Roof decking
- Cellulose insulation
- Dust accumulation
- Ceiling texture
According to EPA guidance, mold can begin growing within 24 to 48 hours after water exposure if materials remain wet.
Typical Timeline
Day 1–2
- Moisture intrusion begins
- No visible mold
Day 3–7
- Hidden fungal growth starts
- Musty odours may develop
Week 2–4
- Visible staining appears
- Mold colonies expand
Month 1+
- Extensive contamination possible
- Structural deterioration may begin
This timeline is accelerated during Toronto’s humid summer months and in poorly ventilated attics.
Signs of Mold After a Roof Leak
Many homeowners focus on visible mold.
The bigger concern is hidden contamination.
Watch for:
Ceiling Signs
- Brown or yellow stains
- Bubbling paint
- Peeling drywall tape
- Sagging drywall
- Soft spots
Attic Signs
- Dark staining on roof sheathing
- White, green, or black fungal growth
- Damp rafters
- Musty odours
Indoor Air Quality Signs
- Persistent musty smell
- Increased allergy symptoms
- Respiratory irritation
- Recurring headaches
Insulation Signs
- Compressed insulation
- Wet insulation
- Discoloration
- Visible fungal growth
Why Wet Attic Insulation Is Often the Biggest Problem
Many homeowners focus on visible ceiling damage.
Professionals often focus on insulation.
Wet insulation becomes problematic because it:
- Holds moisture for long periods
- Loses thermal performance
- Creates hidden mold reservoirs
- Promotes wood decay
- Increases heating costs
Fiberglass Insulation
Fiberglass itself does not support mold growth.
However, dust and debris trapped within it can.
Once soaked, fiberglass frequently loses effectiveness and may require replacement.
Cellulose Insulation
Cellulose insulation is especially vulnerable.
It contains organic material that can support mold growth when wet.
Spray Foam Insulation
Spray foam resists moisture better than fiberglass or cellulose, but surrounding framing and sheathing can still develop mold.
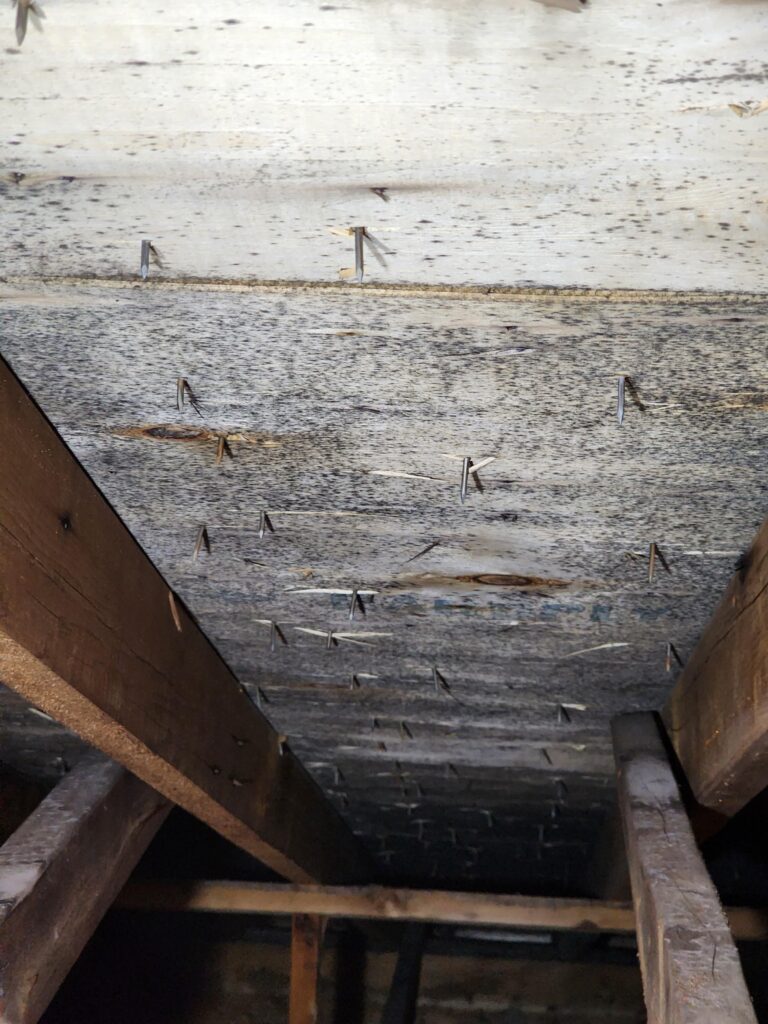
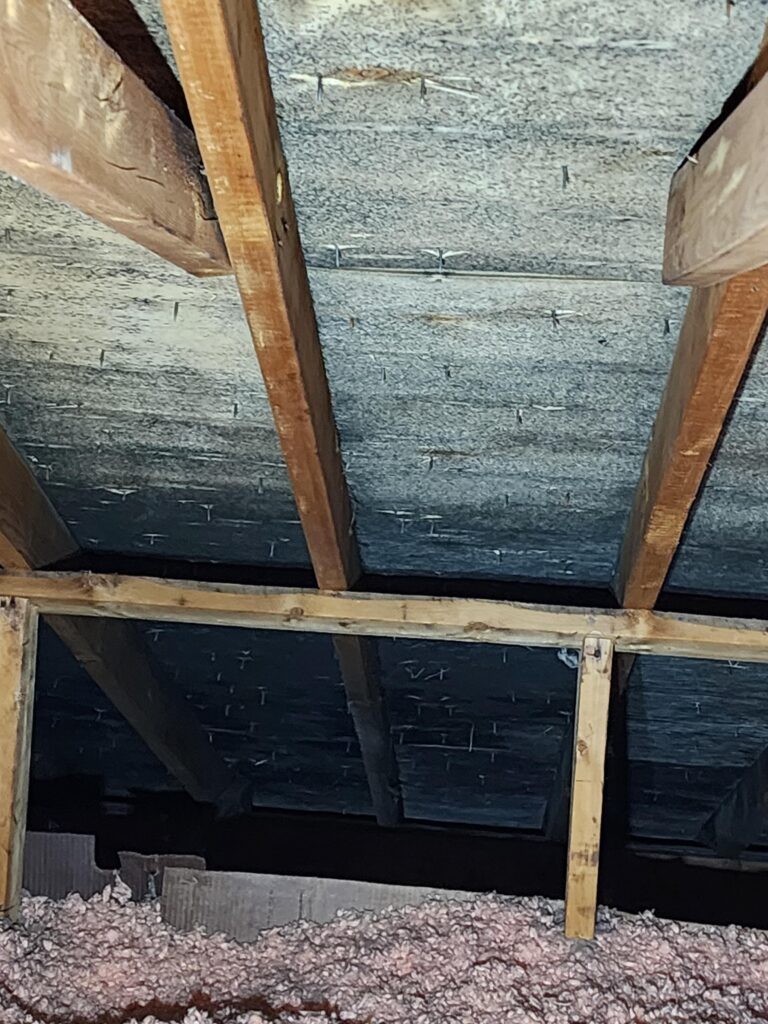
Roof Sheathing Mold: The Hidden Structural Threat
Roof sheathing is one of the first materials affected by long-term leaks.
When moisture repeatedly enters the attic, roof decking remains damp.
Over time, homeowners may notice:
- Black staining
- White fungal growth
- Surface mold colonies
- Wood deterioration
- Delamination of plywood
Important Distinction
Not every dark stain on attic sheathing is active mold.
Professional inspections often combine:
- Moisture measurements
- Visual assessments
- Material condition analysis
- Air quality evaluations when necessary
The goal is identifying active moisture problems, not simply identifying discoloration.
Ceiling Mold After Water Damage
Ceilings are often the first interior surface to show evidence of roof failure.
Common locations include:
- Bedrooms
- Bathroom ceiling
- Hallways
- Bathrooms
- Top-floor condos
- Cathedral ceilings
Once drywall becomes saturated:
- Paper facings support mold growth
- Paint begins failing
- Structural integrity weakens
Can Ceiling Mold Be Painted Over?
No.
Painting over mold does not eliminate contamination.
The moisture source must be corrected first.
Affected porous materials may require removal depending on the extent of contamination.
Toronto-Specific Roof Leak Risks
Toronto’s climate creates unique conditions for roof-related mold growth.
Winter Ice Dams
Ice dams occur when attic heat melts roof snow.
Water refreezes near colder roof edges and backs up beneath shingles.
Result:
- Hidden roof leaks
- Wet insulation
- Ceiling staining
- Attic mold
Spring Thaw
Snowmelt exposes winter roof failures.
Many homeowners discover mold weeks after the leak first occurred.
Summer Storm Damage
Strong winds and heavy rain can damage:
- Shingles
- Flashing
- Roof vents
Small storm-related openings may remain unnoticed for months.
Freeze-Thaw Cycles
Repeated expansion and contraction accelerates roof deterioration and leak formation.
Is Mold After a Roof Leak Dangerous?
Health effects vary depending on:
- Exposure levels
- Occupant sensitivity
- Existing respiratory conditions
- Duration of exposure
Potential symptoms include:
- Nasal congestion
- Eye irritation
- Coughing
- Asthma aggravation
- Throat irritation
Children, seniors, and immunocompromised individuals may be more sensitive to mold-contaminated environments.
The primary concern is not the colour of the mold.
The concern is active moisture and ongoing spore production.
What Professional Roof Leak Mold Remediation Involves
Proper remediation focuses on both contamination and moisture.
Step 1: Stop the Leak
Without fixing the roof, mold returns.
Step 2: Moisture Assessment
Inspect:
- Attic sheathing
- Rafters
- Trusses
- Insulation
- Ceiling cavities
Step 3: Containment
Professionals may use:
- HEPA filtration
- Negative air pressure
- Controlled work zones
Step 4: Remove Contaminated Materials
Potential removals include:
- Drywall
- Wet insulation
- Damaged sheathing
- Severely affected building materials
Step 5: Cleaning
Common methods include:
- HEPA vacuuming
- Surface cleaning
- Antimicrobial treatments when appropriate
Step 6: Drying and Verification
Moisture levels should return to acceptable ranges before reconstruction begins.
Does Home Insurance Cover Mold After a Roof Leak?
Coverage depends on:
- Cause of loss
- Policy wording
- Maintenance history
- Speed of reporting
Insurance may be more likely to respond when:
- Damage results from a sudden event
- Storm damage caused the leak
- The homeowner acted promptly
Coverage is often more limited when damage develops gradually over long periods.
Always document:
- Roof damage
- Ceiling stains
- Moisture readings
- Repair invoices
- Remediation reports
What To Do Immediately After Discovering a Roof Leak
Follow this sequence:
- Stop active water intrusion if possible.
- Protect belongings.
- Photograph all damage.
- Contact a roofing contractor.
- Remove standing water.
- Increase drying.
- Avoid disturbing visible mold.
- Schedule a mold inspection if materials remained wet for more than 24 to 48 hours.
Fast action dramatically reduces remediation costs.
Preventing Mold After Future Roof Leaks
Prevention focuses on moisture control.
Roof Maintenance Checklist
- Annual roof inspections
- Flashing inspections
- Gutter cleaning
- Attic ventilation checks
- Soffit maintenance
- Ice dam prevention
- Prompt repair of missing shingles
Attic Maintenance Checklist
- Monitor humidity
- Inspect insulation annually
- Check for stains after storms
- Examine roof sheathing regularly
- Ensure bathroom fans vent outdoors
Many attic mold problems attributed to ventilation actually begin with small, overlooked roof leaks.
When To Call a Mold Professional
Consider professional evaluation when:
- Mold covers a large area
- Insulation is wet
- Ceiling cavities are affected
- The leak source is unknown
- Mold returns after cleaning
- Occupants experience symptoms
- Structural materials appear damaged
Hidden mold is common after roof leaks because contamination often develops above finished ceilings long before becoming visible indoors.
Frequently Asked Questions
Can mold grow from a small roof leak?
Yes. Even minor leaks can create enough moisture for mold growth if materials remain damp for several days.
How long after a roof leak does mold appear?
Mold can begin developing within 24 to 48 hours under favourable conditions. Visible growth often appears days or weeks later.
Does wet insulation always need replacement?
Not always. The answer depends on insulation type, contamination level, duration of wetting, and drying success.
Is attic mold always caused by roof leaks?
No. Poor ventilation, condensation, and improperly vented bathroom fans are also common causes.
Can I stay in my home during roof leak mold remediation?
Many projects allow occupancy. Larger remediation projects involving extensive containment may require temporary relocation of affected areas.
Does painting over a stained ceiling solve the problem?
No. The moisture source must be identified and corrected before cosmetic repairs.
What part of the attic gets mold first after a leak?
Roof sheathing and insulation are often affected before visible mold appears elsewhere.
Should I test for mold after a roof leak?
Testing may be useful when contamination is hidden, documentation is needed, or the extent of damage is unclear. Moisture investigation is often more important than testing alone.
Sources
- EPA Mold Cleanup in Your Home: https://www.epa.gov/mold/mold-cleanup-your-home
- EPA A Brief Guide to Mold, Moisture and Your Home: https://www.epa.gov/mold/brief-guide-mold-moisture-and-your-home
- Health Canada, Addressing Moisture and Mould in Your Home: https://www.canada.ca/en/health-canada/services/publications/healthy-living/addressing-moisture-mould-your-home.html
- Health Canada, Reduce Humidity, Moisture and Mould: https://www.canada.ca/en/health-canada/services/air-quality/indoor-air-contaminants/reduce-humidity-moisture-mould.html
- Canadian Centre for Occupational Health and Safety, Indoor Air Quality and Mould: https://www.ccohs.ca/oshanswers/chemicals/iaq/iaq_mould.html
- Ultimate Mold Crew, Mold In Home: Symptoms, Causes & Prevention: https://www.ultimatemoldcrew.ca/mold-in-home-symptoms-causes/
- Ultimate Mold Crew, Brown Mold On Walls: https://www.ultimatemoldcrew.ca/brown-mold/
- Ultimate Mold Crew, Mold In Condos Toronto: https://www.ultimatemoldcrew.ca/mold-in-condos-toronto/
Related posts:
- Mold From Water Leak – Signs, Plumbing Causes & Removal
- Mold After Window Leak: Damage, Signs, Causes & Removal
- Mold in Closet & Wardrobe: Signs, Causes, Dangers & Removal
- Black Mold Spots On Pillows – Signs, Dangers & Removal
- Mold on Window Sills – Causes, Dangers, Removal & Prevention
- Mold on Bathroom Ceiling: Causes, Dangers, Removal & Prevention
