Updated on 16-Jun-2026
A window leak rarely stops at the trim. Water can enter the rough opening, soak the drywall, compress insulation and remain against wooden framing. Learn how to recognize hidden damage, warning signs, repair steps and when professional Toronto mold remediation options.
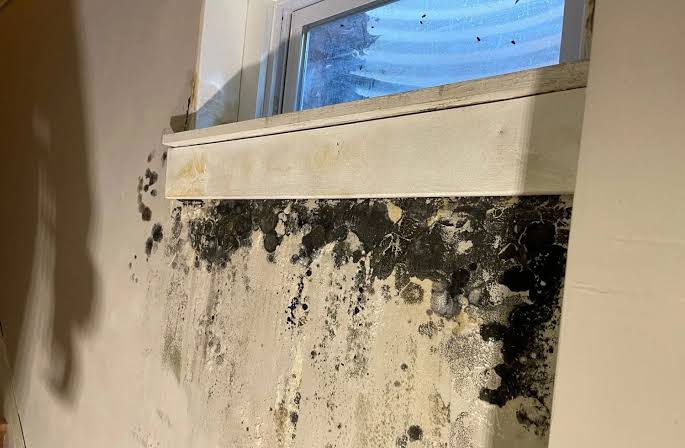
A small stain below a window can conceal a much larger problem.
Rainwater may enter through failed exterior caulking, damaged flashing, deteriorated cladding or gaps around the rough opening. Once inside, gravity carries the water behind the trim and into the wall cavity.
The painted drywall may show only a faint yellow mark. Behind it, the gypsum paper can be wet. Fibreglass insulation may be holding moisture against the studs. The wood framing may remain damp after the room appears dry.
That concealed moisture creates the conditions mold needs to grow.
Health Canada advises homeowners to correct the moisture source and clean up visible mold regardless of its colour or species. Mold can grow on wood, paper, drywall and insulation, including materials hidden inside walls.
The most important step is not spraying the stain. It is determining how water entered, how far it travelled and which materials remain wet.
Table of Contents
A Window Leak Is Not the Same as Window Condensation
These two moisture problems are often confused.
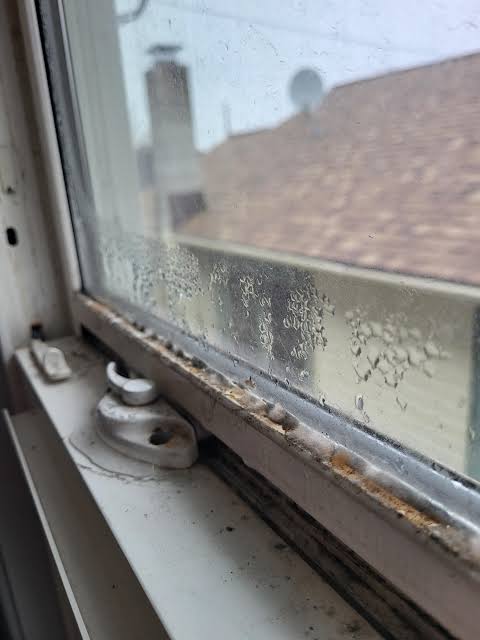
Window condensation
Condensation forms when humid indoor air contacts a cold surface. It usually appears as:
- Water droplets on the interior glass
- Moisture along the lower sash
- Black spotting on caulking or the sill
- Mold concentrated on exposed surfaces
- A problem that becomes worse during cold Toronto weather
Our guide to mold on window sills explains condensation-driven surface growth in detail.
Window leakage
A window leak involves water entering from outdoors or through the surrounding building envelope. It is more likely to cause:
- Stains above, beside or below the window
- Wet drywall after rain
- Bubbling paint
- Soft or swollen trim
- Damp insulation inside the wall
- Mold behind the drywall
- Decay around the rough opening
- Damage that appears on one side of the window rather than evenly across the sill
Condensation begins on an indoor surface. A leak enters through a defect in the window or wall assembly.
That difference changes the repair strategy.
A dehumidifier may help reduce condensation. It will not repair failed flashing or stop rain from entering behind the cladding.
How Rainwater Gets Into a Window Assembly
The visible window is only one part of the system.
A typical wall opening includes the window unit, exterior sealant, flashing, drainage plane, insulation, air barrier, interior drywall and wood framing. Water can bypass one component and travel through another before it becomes visible indoors.
1. Failed exterior sealant
Exterior caulking becomes brittle, separates or cracks as the building moves and the material ages.
Water can then enter joints between:
- The window frame and brick
- The window frame and siding
- Exterior trim and cladding
- Adjacent masonry joints
- Window mullions and connected units
Caulking is not a substitute for properly installed flashing, but failed sealant can still provide an entry route.
2. Missing or defective head flashing
Head flashing directs water away from the top of the window.
When it is absent, reversed, punctured or poorly integrated with the wall’s drainage plane, rain may run behind the frame instead of over it.
Damage often appears at an upper corner or along one side of the opening.
3. Sill-pan or drainage failure
The base of the rough opening should allow incidental water to drain outward.
A missing or incorrectly sloped sill pan can trap moisture beneath the window. The water may then spread into:
- The lower framing
- Interior drywall
- Insulation
- Flooring below the opening
4. Blocked window drainage channels
Many modern windows contain drainage paths or weep openings.
Paint, debris, insects or improper installation can obstruct these outlets. Water that should drain outdoors may collect in the frame and overflow toward the interior.
5. Cracked masonry or deteriorated mortar
In brick-clad homes, water may enter above or beside the window through:
- Cracked bricks
- Failed mortar joints
- Deteriorated lintels
- Missing end dams
- Improperly detailed flashing
- Gaps where masonry meets other cladding
The indoor stain does not always align with the exterior defect. Water can travel along framing or membranes before emerging.
6. Roof, eavestrough or wall leakage above the window
The window may not be the original source.
Overflowing eavestroughs, roof-edge defects, damaged siding or penetrations higher on the wall can direct water downward until it reaches the window opening.
This is why simply recaulking the visible frame does not always solve the problem.
What Happens Inside the Wall After a Window Leak?
Water enters the assembly and moves according to gravity, capillary action and material contact.
A common sequence looks like this:
Exterior defect → wall cavity → insulation → wood framing → drywall paper → interior paint or trim.
Each material reacts differently.
Drywall Damage Around a Leaking Window
Drywall consists of a gypsum core faced with paper. The paper provides an organic surface on which mold can grow when moisture remains available.
Early drywall warning signs
Look for:
- Yellow or brown water stains
- Darkened seams
- Bubbling or blistered paint
- Peeling wallpaper
- Swollen drywall edges
- Crumbling gypsum
- Softness when lightly pressed
- Musty odours near the opening
- A stain that expands after rain
A wall can appear dry at the surface while the rear paper facing remains damp.
Can wet drywall be saved?
Sometimes.
Drywall may be salvageable when:
- The water came from a clean source
- The leak was stopped quickly
- The material was dried thoroughly within a short period
- The gypsum remains firm and flat
- There is no visible mold
- Moisture readings confirm that the assembly is dry
Replacement is more likely when:
- The drywall remained wet for more than approximately 24 to 48 hours
- The paper facing contains mold
- The panel is soft, swollen or delaminated
- Water entered repeatedly
- Contamination is present on the hidden face
- Insulation behind it also requires removal
- The cavity cannot be inspected without opening the wall
The U.S. Environmental Protection Agency recommends drying wet materials within 24 to 48 hours because prompt drying can prevent mold growth in many cases. The agency also notes that this is a practical guideline, not a guarantee that mold cannot begin sooner.
Why painting over the stain fails
A stain-blocking primer may conceal discolouration. It does not:
- Dry the rear of the drywall
- Remove hidden mold
- Restore damaged insulation
- Repair exterior flashing
- Correct wet framing
- Prevent the leak from returning
Paint should be the final cosmetic step, not the first repair.
Mold and Moisture Damage in Wood Framing
Window openings are typically surrounded by structural or supporting wood members.
These may include:
- King studs
- Jack studs
- Headers
- Cripple studs
- Rough-sill members
- Plywood or oriented strand board sheathing
Wood absorbs and releases moisture more slowly than painted surfaces. It can therefore remain damp after the room-facing drywall feels dry.
Signs of framing damage
Possible indicators include:
- Dark spotting on exposed studs
- Musty or earthy odours
- Rusted fasteners
- Swollen wood fibres
- Soft or punky areas
- Splitting near fasteners
- Loss of paint adhesion on adjacent trim
- Repeated moisture readings above the surrounding baseline
- Insect activity associated with damp wood
- Window movement or difficulty opening and closing
Mold growth is not the same as wood rot
Mold grows on the surface and within accessible pores when moisture is available.
Wood-decay fungi digest structural components of the wood. Advanced decay can reduce strength.
A stud with superficial mold staining may still be structurally sound. A sill member that feels soft, flakes apart or has lost its shape may require repair or replacement.
Surface appearance alone cannot confirm structural capacity.
Can moldy framing be cleaned?
Sound wood can often be remediated when the moisture source has been corrected.
Professional treatment may involve:
- Exposing the affected framing
- Establishing containment
- Removing loose contamination with HEPA-filtered equipment
- Cleaning or mechanically treating affected surfaces
- Drying the wood to an acceptable level
- Reassessing remaining staining and material condition
- Repairing or replacing structurally compromised sections
Applying encapsulant to wet or actively contaminated wood is not a complete solution. The wood must first be appropriately cleaned and dried.
What Happens to Insulation After a Window Leak?
Insulation is frequently overlooked because it sits behind the drywall.
Its condition matters for three reasons:
- It can retain water
- It can slow drying of nearby framing
- It can lose thermal performance
Health Canada specifically identifies insulation as a material on which mold may grow or within which contamination may remain hidden.
Fibreglass batt insulation
Fibreglass itself is inorganic, but installed batts collect:
- Dust
- Wood fibres
- Drywall paper fragments
- Organic debris
- Contaminated water
The facing material may also support mold.
Wet fibreglass can slump or compress. That reduces its ability to trap air and insulate the wall.
Removal is usually the safer choice when the batt:
- Remained wet for an extended period
- Smells musty
- Contains visible growth or debris
- Is compressed or matted
- Was exposed to contaminated water
- Prevents inspection of the wall cavity
- Cannot be dried evenly in place
Cellulose insulation
Cellulose is made primarily from paper-based material.
It can absorb significant moisture, settle and lose insulating value. Wet cellulose around a leaking window normally requires removal so the cavity and framing can be examined and dried.
Spray polyurethane foam
Closed-cell spray foam may resist water absorption better than open-cell products, but leakage can still travel along its edges or become trapped between the foam and wood.
Open-cell foam can absorb and retain more moisture.
Foam may need selective removal when it:
- Conceals wet sheathing
- Separates from the substrate
- Has persistent odour
- Prevents moisture measurement
- Traps water against framing
- Contains visible contamination
Why wet insulation cannot simply be covered
Closing the wall before the cavity is dry can recreate the conditions that caused the problem.
Natural Resources Canada advises correcting moisture and structural defects before adding or replacing insulation.
The proper sequence is:
Stop the leak → remove unsalvageable material → dry and verify framing → restore air and moisture control layers → reinstall insulation → close the wall.
How Quickly Can Mold Develop After a Window Leak?
There is no universal countdown.
Temperature, material type, airflow, humidity, spore availability and the amount of water all affect growth.
However, the first 24 to 48 hours are critical.
EPA guidance repeatedly recommends drying damp building materials within that period to reduce the likelihood of mold growth.
Treat 48 hours as an action threshold, not a safe waiting period.
Begin water extraction, controlled drying and investigation as soon as the leak is discovered.
Signs Mold May Be Hidden Behind the Wall
Visible growth is not required for a mold problem to exist.
Watch for these clues:
A musty smell that becomes stronger near the window
Odour may escape through:
- Electrical outlets
- Trim gaps
- Baseboard joints
- Cracks in drywall
- The window casing
Paint or drywall changes after rain
A stain that darkens only during storms strongly suggests active water intrusion.
Repeated bubbling after repainting
Recurring paint failure means moisture is still affecting the substrate.
Cold or damp wall sections
An infrared camera may help locate temperature anomalies, but thermal imaging does not detect mold. It identifies patterns that may justify further moisture testing.
Elevated moisture readings
Pin and pinless moisture meters can help compare the affected area with nearby dry materials.
Meters require careful interpretation. Metal corner bead, fasteners, foil-faced insulation and material density can distort readings.
Soft trim or discoloured baseboards
Water can travel downward from the window and emerge at the floor.
Mold that returns after surface cleaning
Recurring growth indicates that the moisture source or hidden reservoir has not been resolved.
Unexplained indoor-air or respiratory concerns
Damp indoor environments and mold can contribute to irritation, allergic symptoms and worsening asthma in susceptible people. Health Canada recommends addressing indoor dampness and visible mold rather than attempting to determine safety by colour alone.
Symptoms alone cannot locate the source. A building investigation is still required.
How Professionals Investigate a Leaking Window
A useful inspection follows the water pathway rather than looking only at the stain.
1. Interior visual assessment
The inspector examines:
- Stain shape and location
- Paint and drywall condition
- Trim joints
- Sill condition
- Adjacent flooring
- Baseboards
- Nearby outlets
- Previous repair marks
2. Exterior inspection
The exterior review may include:
- Sealant joints
- Window corners
- Head flashing
- Sill slope
- Weep openings
- Brick and mortar
- Lintels
- Siding transitions
- Penetrations above the opening
- Eavestrough and roof drainage
3. Moisture mapping
Readings are taken at the affected area and compared with known-dry sections of the same material.
The goal is to establish:
- The wettest point
- Lateral spread
- Downward migration
- Whether drying is progressing
- Whether apparently unaffected materials are involved
4. Thermal imaging
Thermal cameras may reveal cool patterns caused by evaporation or missing insulation.
The images must be confirmed with direct moisture measurements. A cold area may also result from thermal bridging, air leakage or insulation defects.
5. Controlled invasive inspection
When concealed damage is likely, a small inspection opening may provide more reliable information than repeated surface testing.
Opening the wall can reveal:
- Mold on the rear drywall paper
- Wet or compressed insulation
- Corroded fasteners
- Mold on studs or sheathing
- Water tracks
- Decay at the rough sill
- Gaps in the air barrier
- Evidence of repeated leakage
In older Toronto homes, renovation materials should be assessed for asbestos or lead hazards before destructive work. Drywall compound, plaster, caulking, insulation and other legacy products may require testing based on the building age and material history.
Is Mold Testing Necessary After a Window Leak?
Not always.
Health Canada emphasizes visual inspection, moisture investigation and correction of dampness. CCOHS likewise identifies visual inspection as the most reliable way to recognize many mold problems.
Testing may add value when:
- No visible mold is present but odours persist
- The affected cavity cannot be fully accessed
- Occupants have specific medical concerns
- A landlord, insurer or property manager requires documentation
- The remediation scope is disputed
- Post-remediation verification is needed
- Multiple potential sources exist
- The building is involved in a real-estate transaction
Testing does not replace moisture correction.
A laboratory report may identify fungal particles, but it cannot repair a leaking window or dry the framing.
What to Do Immediately After Discovering a Window Leak
1. Stop or limit incoming water
Temporary action may include:
- Protecting the opening from exterior rain
- Clearing blocked drainage openings
- Redirecting roof or eavestrough discharge
- Removing wet interior coverings
- Contacting a qualified window or building-envelope contractor
Do not permanently seal exterior drainage paths without understanding how the window is designed to drain.
2. Document the damage
Photograph:
- The window during or immediately after rain
- Exterior defects
- Stains and paint damage
- Wet trim
- Moisture readings
- Damaged belongings
Keep invoices and inspection reports if an insurance claim may be filed.
3. Move belongings away
Remove curtains, furniture, boxes and textiles from the damp area.
Place wet contents in a controlled drying area rather than against another wall.
4. Remove standing water
Use suitable extraction equipment for clean rainwater.
Do not use an ordinary household vacuum for water.
5. Begin dehumidification
A dehumidifier can reduce room humidity. Professional air movers and dehumidifiers may be required for a wall cavity.
Avoid directing high-powered fans across visible mold because uncontrolled airflow may distribute spores and fragments.
6. Determine whether the wall must be opened
A surface stain may not require demolition when the leak was brief and drying began immediately.
Opening becomes more likely when:
- Drywall remains wet
- Insulation is involved
- Odour persists
- Mold is visible
- The leak has happened before
- Moisture readings do not decline
- The wall is insulated and cannot dry inward
- The source involved contaminated water
7. Keep vulnerable occupants away from active remediation
Children, older adults, people with asthma and immunocompromised individuals may be more sensitive to dampness, mold and demolition dust.
Can You Clean Window-Leak Mold Yourself?
The answer depends on the extent, material and accessibility of the damage.
A homeowner may be able to address a very small, superficial patch on a washable surface after the leak has been repaired.
Professional help is more appropriate when:
- Mold extends behind drywall or trim
- Insulation is wet
- Structural framing is affected
- The area is larger than a minor isolated patch
- The leak is recurring
- The source cannot be identified
- Demolition is needed
- HVAC pathways may spread dust
- Occupants have health vulnerabilities
- Sewage or contaminated water is involved
- Asbestos-containing materials may be disturbed
EPA guidance notes that the scope of remediation, protective equipment and containment should increase with the size and complexity of the affected area.
Why Bleach Is Not a Complete Fix
Bleach may lighten staining on some surfaces. It does not solve the wall-assembly problem.
It cannot reliably:
- Reach the rear side of drywall
- Dry wet insulation
- Repair flashing
- Restore compressed batts
- Rebuild decayed wood
- Confirm that hidden materials are clean
- Prevent rain from re-entering
Porous, damaged drywall and contaminated insulation often require removal rather than surface spraying.
Moisture correction remains the controlling step.
Professional Remediation Process for Window-Leak Mold
A properly scoped project generally follows this order.
Step 1: Confirm and repair the water source
Remediation should not begin as a stand-alone cosmetic exercise.
The building-envelope defect must be repaired or formally scheduled for repair. This may involve:
- Replacing failed sealant
- Correcting flashing
- Repairing masonry
- Restoring the drainage plane
- Clearing frame drainage
- Reinstalling the window
- Correcting roof or eavestrough defects
Step 2: Establish containment
Polyethylene barriers and controlled access may be used to separate the work area from occupied spaces.
Negative air pressure and HEPA-filtered air-cleaning equipment may be appropriate when demolition could release contaminants.
Step 3: Remove unsalvageable porous materials
The remediation team may remove:
- Mold-contaminated drywall
- Wet batt insulation
- Saturated cellulose
- Damaged trim
- Deteriorated sheathing
- Unsound wood components
Materials should be handled and bagged in a way that limits cross-contamination.
Step 4: Clean remaining structural materials
Sound framing and sheathing may be HEPA vacuumed, cleaned and mechanically treated when appropriate.
The method depends on:
- Material condition
- Depth of growth
- Surface accessibility
- Structural integrity
- Project specifications
Step 5: Dry the assembly
Drying may involve:
- Commercial dehumidifiers
- Controlled air movement
- Cavity-drying equipment
- Heat where suitable
- Repeated moisture measurements
The wall should not be rebuilt based only on elapsed time.
Step 6: Verify dryness and cleanliness
Before reconstruction, the contractor should confirm that:
- The source has been corrected
- Remaining materials are dry
- Visible dust and mold have been removed
- The work area is clean
- No musty odour remains
- The cavity is ready for insulation and closure
Step 7: Restore the wall system
Reconstruction may include:
- Framing repairs
- Air-barrier restoration
- Replacement insulation
- Vapour-control repairs where applicable
- New drywall
- Primer and paint
- Reinstallation or replacement of trim
Reconstruction should restore the wall’s moisture, air and thermal functions, not merely its appearance.
Special Considerations for Toronto Homes
Toronto’s climate places window assemblies under several forms of moisture stress.
Wind-driven rain
Strong storms can force water into small defects that remain dry during light rainfall.
Upper floors and exposed elevations may receive greater wind pressure.
Freeze-thaw cycling
Water entering masonry cracks can freeze, expand and worsen exterior deterioration.
A minor defect in autumn may become a larger pathway by spring.
Winter temperature differences
Cold outdoor temperatures can create condensation at poorly insulated rough openings.
A home may therefore have both problems at once:
- Rain leakage from outside
- Condensation caused by an interior cold spot
Older brick homes
Many Toronto houses have masonry openings that have been repaired or retrofitted several times.
Replacement windows may not be fully integrated with the original drainage system. New caulking can conceal defects without correcting flashing behind the frame.
High-rise and condominium buildings
In a condominium, the window, exterior wall and interior finishes may fall under different maintenance responsibilities.
Residents should:
- Notify property management promptly
- Document dates and weather conditions
- Avoid unauthorized exterior repairs
- Request investigation of the surrounding facade
- Confirm who is responsible for drying and interior restoration
Finished basements
Basement windows and window wells can leak because of:
- Blocked drains
- Poor grading
- Snow accumulation
- Cracked window wells
- Missing covers
- Foundation-wall defects
Water may spread behind finished basement walls before becoming visible.
Does Home Insurance Cover Mold From a Window Leak?
Coverage depends on the policy and the cause of loss.
Insurance may be more likely to respond when damage results from a sudden, accidental event. Coverage may be limited or excluded when the problem is linked to:
- Long-term seepage
- Poor maintenance
- Deteriorated caulking
- Repeated leakage
- Construction defects
- Gradual mold growth
Report significant damage promptly.
Do not discard damaged materials until the insurer has provided instructions, unless immediate removal is necessary for safety or loss control. Photograph everything first.
A professional moisture report can help distinguish a recent event from long-term damage, although it cannot determine policy coverage.
How to Prevent Mold From Returning Around a Leaking Window
Inspect exterior joints each year
Check sealants, flashing, cladding transitions and masonry.
Schedule repairs before winter or prolonged spring rain.
Keep drainage paths open
Do not paint over weep openings or fill channels that are intended to release water.
Maintain eavestroughs and downspouts
Overflow above a window can mimic a failed window unit.
Direct roof water away from the wall and foundation.
Repair cracks above the opening
Water often enters higher than the indoor stain.
Manage indoor humidity
Leak repair does not eliminate condensation risk.
During cold Toronto weather, keep indoor humidity low enough to prevent persistent water on glass and cold trim.
Restore insulation correctly
Missing or compressed insulation around the rough opening can create cold surfaces.
Insulation improvements must be paired with proper air sealing and moisture management.
Recheck after the next heavy rain
A repair is not proven by a dry sunny day.
Inspect the interior during and after wind-driven rain. Compare moisture readings where possible.
When Should You Call Ultimate Mold Crew?
Contact a professional mold-remediation company in Toronto when:
- Drywall around the window feels soft
- A musty smell persists
- Mold appears after rain
- The same stain keeps returning
- Wet insulation is suspected
- Framing may be affected
- The wall requires selective demolition
- You cannot determine the extent of hidden moisture
- The property is occupied by someone with respiratory sensitivities
- Documentation is needed for an insurer, landlord or property manager
Ultimate Mold Crew provides mold inspection, moisture assessment, water-damage restoration, selective demolition and mold remediation across Toronto and the Greater Toronto Area.
Our investigation can include visual assessment, moisture mapping, thermal imaging where appropriate and inspection of drywall, wood and insulation. Where remediation is required, the scope may include containment, HEPA filtration, removal of contaminated porous material, structural cleaning and drying.
A leaking window is a building-envelope problem first. Mold is one of its consequences.
Both must be addressed for the repair to last.
How do I know whether mold is behind drywall near a window?
Common signs include a persistent musty smell, bubbling paint, stains that worsen after rain, soft drywall and moisture readings that remain elevated. Confirmation may require removing trim or creating a controlled inspection opening.
Does drywall always need to be replaced after a window leak?
No. Drywall may be retained when the water was clean, drying began promptly, the panel remains firm and no mold is present. Replacement is more appropriate when the drywall is swollen, soft, mold-contaminated or remained wet long enough for hidden growth to become likely.
Can insulation dry inside a closed wall?
Some assemblies can dry under controlled conditions, but insulation slows airflow and may retain moisture against framing. Wet, compressed, contaminated or musty insulation often needs to be removed so the cavity can be inspected and dried.
Can moldy wood studs be saved?
Structurally sound framing can often be cleaned and dried. Wood that is soft, decayed, distorted or unable to hold fasteners may require repair or replacement. A qualified contractor should assess structural damage.
How long after a window leak does mold start?
There is no exact starting time. Conditions vary. Building-health guidance treats the first 24 to 48 hours as the critical drying period because mold becomes more likely when materials remain wet.
Is black mold around a leaking window more dangerous than other colours?
Colour does not reliably identify the species or health risk. Any indoor mold indicates excess moisture and should be addressed. The priority is correcting the leak and safely removing affected material.
Will recaulking the window stop the leak?
It may stop water entering through a failed surface joint, but it will not correct missing flashing, blocked drainage, cracked masonry or leakage originating higher on the wall. The full water pathway should be investigated.
Should I run a fan on wet drywall?
Air movement can speed drying when no mold is present and the source water is clean. Do not direct a fan across visible mold because it can spread spores and contaminated dust into other rooms.
Is mold testing required before remediation?
Usually not when visible mold and a clear moisture source are present. Testing may be useful for concealed problems, disputed scopes, vulnerable occupants or post-remediation verification.
Who repairs the leak, a window company or mold-remediation company?
A window installer, building-envelope contractor, roofer or masonry specialist may be required to correct the exterior defect. A mold-remediation company investigates and treats contaminated interior materials. Complex projects often require both trades.
Can a window leak damage the floor below it?
Yes. Water may travel down studs, collect behind baseboards and reach hardwood, laminate, carpet or subflooring. Inspect below the opening even when the visible stain is higher on the wall.
Is window-leak mold an emergency?
It becomes urgent when water is actively entering, electrical components are wet, ceilings or walls are unstable, contaminated water is involved or vulnerable occupants are exposed. Even a small leak should be investigated promptly because hidden materials can remain wet.
Cited Sources
- Health Canada. Guide to Addressing Moisture and Mould Indoors
https://www.canada.ca/en/health-canada/services/publications/healthy-living/addressing-moisture-mould-your-home.html - Health Canada. Mould: Reduce Humidity, Moisture and Mould
https://www.canada.ca/en/health-canada/services/air-quality/indoor-air-contaminants/reduce-humidity-moisture-mould.html - Health Canada. Guidance for Indoor Air Quality Professionals
https://www.canada.ca/en/health-canada/services/publications/healthy-living/guidance-indoor-air-quality-professionals.html - Health Canada. Flood Cleanup: Keep in Mind Indoor Air Quality
https://www.canada.ca/en/health-canada/services/publications/healthy-living/flood-cleanup-keep-mind-indoor-air-quality.html - Canadian Centre for Occupational Health and Safety. Indoor Air Quality: Moulds and Fungi
https://www.ccohs.ca/oshanswers/chemicals/iaq/iaq_mould.html - Canadian Centre for Occupational Health and Safety. Flood Clean-up
https://www.ccohs.ca/oshanswers/biol_hazards/flood_cleanup.html - Natural Resources Canada. Keeping the Heat In: Insulating Walls
https://natural-resources.canada.ca/energy-efficiency/home-energy-efficiency/keeping-heat-section-7-insulating-walls-insulating-renovating-building-additions - Natural Resources Canada. Keeping the Heat In: How Your House Works
https://natural-resources.canada.ca/energy-efficiency/home-energy-efficiency/keeping-heat-section-2-your-house-works - Natural Resources Canada. Comprehensive Air-Leakage Control in Your Home
https://natural-resources.canada.ca/energy-efficiency/home-energy-efficiency/keeping-heat-section-4-comprehensive-air-leakage-control-your-home - EPA. A Brief Guide to Mold, Moisture and Your Home
https://www.epa.gov/mold/brief-guide-mold-moisture-and-your-home - EPA. Mold Cleanup in Your Home
https://www.epa.gov/mold/mold-cleanup-your-home - EPA. Mold Course, Chapter 2: Drying Buildings, Building Materials and Furnishings
https://www.epa.gov/mold/mold-course-chapter-2 - EPA. Mold Course, Chapter 4: Dry Quickly
https://www.epa.gov/mold/mold-course-chapter-4 - EPA. Mold Remediation in Schools and Commercial Buildings, Chapter 3
https://www.epa.gov/mold/mold-remediation-schools-and-commercial-buildings-guide-chapter-3 - EPA. Table 1: Water Damage Cleanup and Mold Prevention
https://www.epa.gov/sites/default/files/2014-08/documents/table1.pdf
